Sunday 25 October 2015

Textile treats


My applique bird
I have been very fortunate to be able to attend two fantastic Textile workshops this week. Both organised by Creative Futures at Weave maker space. This is a fab resource just 5 mins up the road from where I live, but this week is the first time I've had opportunity to use it.

On wednesday evening I attended a workshop on silk paper making and bondable fibres. This was run by artist Wendy Ann Sranger. We experimented with making paper from a range of silk fibres and embedding different objects between them. The process was quite quick but it did take a while to dry. In fact my thicker piece took until Saturday morning to be completely dry.

Working with wet silk fibres
Angelina fibres, net and silk fibres


We also worked with angelina fibres - which i have used before. the process is quite simple. you just layer the fibres and other items and press with an iron, making sure the fibres are between non stick baking paper so they don't stick to the iron.


On Saturday I attended a full day workshop with textile artist Mandy Pattulo. I had seen some of mandy's work at local exhibitions and was intriqued by her processes. She gave a talk about how she approaches her work and what is important to her. Throughout her career as an artist she's been interested in tyhe use of quilts and the area of the UK we live in has a rich quilt history.

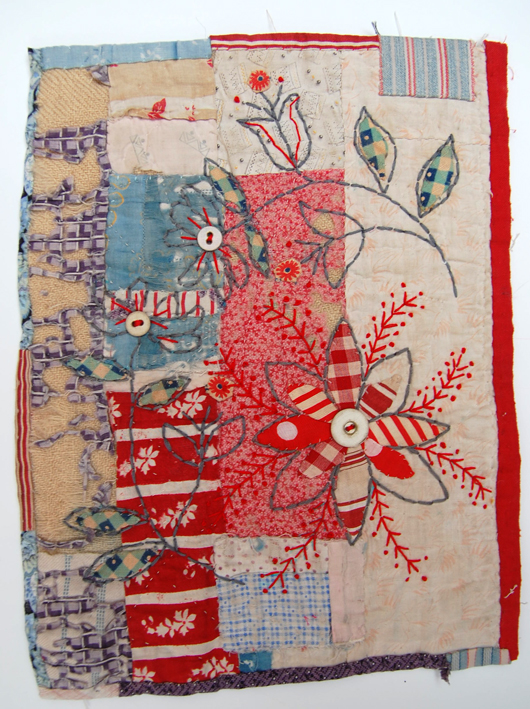
These are both examples of Mandy's work. 

She shared with us some of her work, you can see some more examples here.

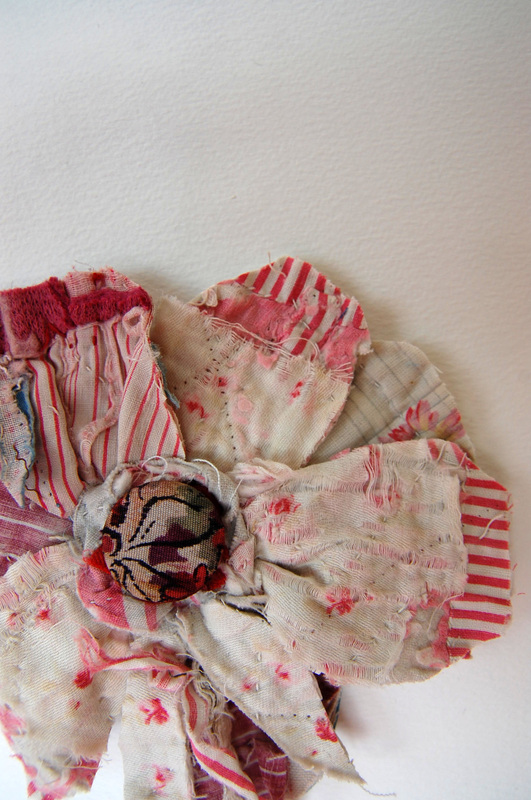
We then learn about one of the techniques Mandy uses and used it to make out own applique on a piece of vintage quilt. We used a finger turned applique method. I was quite surprised how quickly I could do this. Our designs were then embellished with embroidery. I could certainly see myself using some of these techniques. especially when we do our school community quilt later in the academic year.
My applique bird

I'm looking forward to the next couple of workshops in about three weeks time.

Sunday 18 October 2015

Bells Palsy update


Well. It's been 4 months since I was diagnosed with Bells Palsy. It seems like soooooo long ago. But the good news is it is improving, and I've seen marked improvement since September. I feel like i'm nearly back to normal, but not quite. You can read about the beginning of my journey here
My hair has also grown in really thickly after having it shaved off at the end of July.

So I thought I'd share a bit of the journey here. If you've been diagnosed with this condition it might help you figure out what to expect. This is rather picture heavy!


This was just after I was diagnosed. I think it got worse for a while before getting better.


Middle of July - Not much has changed.


 My closes a little bit more here. Still July - I was taking photos weekly. I soon got bored of that!


And now with a shaved head - Still not much Improvement. This is Late July.


 Early August. With concentration I can close my eye. Still drinking through a straw for most of the time. I can manage a cup if its thin china.


The eye is much better. I can manage a cup, but my grin is still wonky. Putting on lipstick and mascara is still tricky. Late August.


Now I feel like my face is almost back to normal. My grin is still a bit wonky and I'm still taping my eye at night - mainly as a precaution. Drinking is ok, I can't wink my right eye yet, but I can close it. Eating things that I have to take a bite out of is still tricky and I do still bite my gum on occassion. People are starting to notice the improvement. Oh and my hair ist starting to lie a little flatter after sticking up over the last few weeks.


Sunday 11 October 2015

Handbags at Dawn

or Purses Galore.
Isn't this fabric brilliant? My Friend Alli bought me 2m of it for my birthday. I had been keeping an eye our for a suitable pattern and knew I'd found it when I saw this loose fitting shift dress from the September issue of Burdastyle Magazine.


I had just enough fabric to make the dress, but not enough to match the pattern really mwell, but I still think it works. I originally made it with pockets, but the first time I wore it I caught the pocket on a door handle and ripped it a little. So I sewed them up. I still think it looks good.


The Fabric is a quilting weight cotton from The Sewing Box in Morpeth. They've recently got a website check it out here.


I made the dress up in a size 36. I'm normally a 38, but the design is quite loose fitting and I didn't want it too baggy. I still ended up taking in the princess seams between the bust and the hip and increasing the back darts to give more shaping. I let out the side seams under the arms by 1/2cm and dropped the armhole by 1cm. I did this simple to allow for the wearing of a jumper or long sleeved tee in the cooler months. the fit was ok without this adjustment, but I would only have been able to wear with a cardy the whole winter.


I would recommend this pattern and fabric and I have had loads of positive comments about both the style and fabric. It does look a bit creased, but you can probably tell by the light that these photos were taken at the end of the day. On another note I'm still growing out my shaved head. My hair sticks up everywhere! Does anyone have any styling tips?


Sunday 27 September 2015

Corsets, Papier Mache and Masquerades


I finally finished my first ever corset! and I wore it! Yesterday was my friend Rebecca's 50th Birthday and she had a masqureade ball to celebrate. I had been planning my outfit for a few weeks and it was the perfect opportunity to wear a corset.

I used the GBGS pattern from series 3, adjusted the neckline to make it more sweetheart shaped, and reduced the waist to give some reduction.


The Details:
Outer fabric: A chinese style brocade in royal blue with a bit of gold in there. I've had this in my stash for a couple of years and can't remember where it came from.
Inner layer: Artists canvas - couldn't get my hands on any coutil, of this was the next best option.
Lining: white cotton also from my stash.
Bra Cups: salvaged from an old bra.
Boning & Eyelets: Spiral Steel and Sprung steel from Sew Curvy.

The corset was fairly simple to put together, but you do need to be rather precise. I decided to make this without a busk and really it needs longer laces as I can only just get it on over my head without unlacing it. I should have made a muslin as this is quite a short corset and I have a long torso so next time I'll make a longer version.

The boning is contained within the canvas layer and then has the shell and lining attached. the bias binding is self fabric and was machine stitched to the outside layer and then turned and finised with fell stitched on the lining side.


I did have to practise with the eyelets as there was a lot of fabric to get through. I marked the placement on the lining side, but had to get my husband to hammer the punch through the fabric. I used eyelet pliers to secure the eyelets. (you might have seen more on my instagram feed over the last few weeks @artcoopsville)


As the corset had gold in the fabric I decided to pair it with a gold skirt and thought that a full circle skirt would be the way to go. I bought my fabric from Sharma's in the Victoria Centre Market in Nottingham a few weeks ago. it's a shot fabric with gold threads running one was and black running the other. I added an invisible zip and hand stitched the hem (= hours of work), mainly because I didn't have any tread exactly the right colour. Oh and I like hand stitched hems.


I also made my mask from papier mache, it was a bit heavy to be honest and I didn't keep it on long. My husband decided he was going to go as Frank Sidebottom.


So we spent ages making his head, also from papier mache. the shape was finished a few days ago, but I spent most of yesterday painting it. safe to say it caused a bit of a stir when we arrived at the party.


Many thanks to Pam at Threading my way for featureing this post.


Monday 14 September 2015

Libby's Dress (Anna dress hack)


Whilst we were in london back in July, my sister picked out this beautiful teal fabric. We bought it from a little shop on Brick Lane and I made up her dress.

The Little shop, which was crammed full of fabric!

Libby decided she would like a slash neck dress that had cap sleeves and a full ish skirt, but that also emphasised her tiny waist. I knew just the pattern to hack! The bodice is from the By Hand London Anna dress. I used a base 14 size to accomodate the bust and back width, but Libby's waist was nearer a size 8. I took a little off of the side seams and made the darts deeper to redude the waist measurement.


The skirt is approximately a half circle skirt, and the ties are based on my Hobbs style dress, that I made earlier in the year.

The fabric is very well behaved and did not need lining, so I used facings for the neck edge. it's such a lovely colour and perfect for Libby. It can be dressed up or down. On this occassion she wore it to a family party with a simple necklace.


It's not a bad fit considering it was made based on measurements alone - no fitting. Rather tricky to fit when you live 300 miles apart. Still I think it really suits her and I hope she gets plenty of wear from it.
The photos were taken by my brother in law.

LinkWithin

Related Posts Plugin for WordPress, Blogger...